ATR42-500 TAROM Просмотр ZIP-архива
TAROM ATR42-500/Docs/ATR 42.htm
<html>

<head>
<meta http-equiv="Content-Language" content="en-gb">
<meta http-equiv="Content-Type"
content="text/html; charset=windows-1252">
<meta name="GENERATOR" content="Microsoft FrontPage 5.0">
<meta name="ProgId" content="FrontPage.Editor.Document">
<title>ATR 42-300, by F</title>
</head>

<body link="#0000FF" vlink="#800080">

<p><font size="5"><b>ATR 72-500, by F. Sбnchez-Castaсer<span lang="es">. Manuals
and checklists by Werner Schott.</span></b></font></p>

<p><font size="5"><b>Version 1.0 - Iberia Regional / Air Nostrum  livery</b></font></p>

<p>ATR 72-500 in Iberia Regional / Air Nostrum<b><font size="5"> </font></b>livery. Designed by F.
Sбnchez-Castaсer for FS2002. Includes virtual cockpit, custom
panel and gauges. Customs sounds also provided.<span lang="es"> Flight manuals
and checklists made by Werner Schott.</span></p>

<p><b><u>Installation:</u></b></p>

<p>You should have a basic idea of the flight simulator files and
folders structure in order to perform the installation. Remember
one thing: if you are prompted to overwrite a file, don’t do
it unless you are 100% sure what you’re doing (maybe you
made a mistake and are about to delete your favourite plane, so
don’t do it). </p>

<ul>
  <li>The archive FSC_ATR<span lang="es">7</span>2500v10.zip contains two zip files inside:
  <span lang="es">aircraft</span>.zip
    and gauges.zip.  </li>
</ul>

<ul>
    <li><span lang="es">Extract the file aircraft.zip into </span>your FS2002\aircraft\ folder.  Activate the option "Use folder names" in WinZip. You'll find that several sub-folders have been created: docs, model, panel, sound and texture.<br>
    </li>
</ul>

<p><img src="Image2.jpg" width="172" height="172"></p>
<p> </p>

<ul>
    <li>Extract the contents of gauges.zip into your
        fs2002\gauges folder. Overwrite files if asked; this archive contains
    some updtes to my previous ATR42- 300 and 500, mainly the autopilot.</li>
</ul>

<blockquote>
    <p><b><blink>IMPORTANT:</blink> INSIDE THIS ARCHIVE
    THERE <span lang="es">ARE SOME</span> FILE<span lang="es">S</span> CALLED FSC.ATR.FL.CAB
    <span lang="es">, FSC.ATR.ovhd.cab, AND FSC.ATR.radios.cab </span>(.cab extension may be
    hidden in your system). DO NOT
    DE-COMPRESS <span lang="es">THEM</span>!!! DO
    NOT EXTRACT THE FILES INSIDE IT!!! (unless you
    know what to do with them) JUST
    COPY THE FILE INTO THE GAUGES FOLDER, AS STATED ABOVE. FS2002 WILL TAKE CARE OF FINDING
    THE BMP<span lang="es">'s</span> AND XML<span lang="es">'s</span> INSIDE IT. <u> IF
    YOU DECOMPRESS IT, MOST PROBABLY HALF OF THE GAUGES WILL BE
    MISSING IN YOUR PANEL</u>. </b></p>
</blockquote>

<p><b><u>The panel</u></b></p>

<p>The panel provided with this release contains a set of custom
made gauges, which try to simulate as accurately as possible the
systems of a real ATR <span lang="es">7</span>2-<span lang="es">5</span>00. Here is a brief explanation of
those that differ from the default FS2002 gauges.</p>

<p> </p>

<p> </p>

<p><img src="Image16.gif" width="106" height="106"></p>

<p><b>Altimeter:</b> <span lang="es">By means of the knob in the left bottom
corner, hte reference speed bug can be adjusted</span>.<span lang="es"> This
reference speed will be used for the fast/slow indication in the ADI below.</span></p>

<p> </p>

<p> </p>

<p><img src="Image17.gif" width="154" height="127"></p>

<p><b>A<span lang="es">DI</span>:</b> at the left side there is an indicator
which will compare the aircraft’s speed with respect to the <span lang="es">
reference speed adjusted in the airspeed indicator</span>. At the bottom and at the
right there is NAV/LOC and glide slope indicators, which will
activate when available.<span lang="es"> </span></p>

<p><span lang="es">When an autopilot mode is selected, it will be indicated at
the top left and right corners (note: there is a known bug which will sometimes
prevent the autopilot modes be properly displayed).</span></p>

<p><span lang="es">Under 2500ft agl, a radio altimeter is shown in blue in the
left bottom corner.</span></p>

<p> </p>

<p> </p>

<p><img src="Image18.gif" width="153" height="138">  <img
src="Image19.gif" width="42" height="33"></p>

<p><b>HSI display:</b> clicking on it will toggle rose/approach
mode. The switch on the right will toggle between GPS and NAV1
mode.</p>

<p> </p>

<p> </p>

<p><img src="Image20.gif" width="105" height="145"></p>

<p><b>CCAS (Centralised Crew Alert System):</b> Contains all
basic warnings.</p>

<p> </p>

<p> </p>

<p><img border="0" src="ATR%20421.gif" width="71" height="109">  <img
src="Image22.gif" width="75" height="72"></p>

<p><b>Power Management and Torque gauges:</b> Unlike the ATR42-300 , the power management provided in the ATR
<span lang="es">7</span>2-500 <span lang="es">can </span>perform automatic torque adjustment<span lang="es">,
as well as rpm control</span>. The PWR MGT selector has
four positions for TO (takeoff/go around), MCT (maximum climb
torque), CLB (climb) and CRZ (cruise). The amber bugs in the
torque gauges will show the optimum torque for each of these positions. The optimum torque is also a
function of the engine rpm, pressure, altitude and temperature. At the bottom of
the gauge there are pushbuttons for engaging automatic torque separately for
each engine. This function must remain disconnected during descent, landing and
ground operations.<span lang="es"> </span></p>

<p><span lang="es">There are two ways of using the gague: When power is
controlled manually, the pilot must adjust the power levers to the torque
indicated by the amber bugs. The rpm will be automatically set to 100% (for TO
position) or 82% (for all other positions).</span></p>

<p><span lang="es">The power can be controlled also automatically. To do this,
engage the two pushbuttons at the lower part of this gauge. The torque delivered
by each engine will automatically be ajusted to the amber bugs.  (note1:
this automatic function is in the real plane adjusted by moving the power levers
forward to AUTO position. This was difficult to implement and more difficult to
operate in this panel, so the buttons have been provided instead) (note2: it is
recommended that both buttons are pressed with parking brakes on before taking
the runway, in order to test the function of this gauge before takeoff. Under
certain circumstances the gauge logic will lock to a low power setting. The test
will reset the gauge and ensure proper function during take off).</span></p>

<p>A display has been provided in the gauge, which will show the
desired torque. This display does not exist in the real plane,
but I have included it in order to facilitate its use in FS2002.</p>

<p>The torque indicators are also provided with a white bug,
which is manually adjustable by operating the knob at the right
bottom corner. They should be adjusted according to the
aircraft’s published performance tables (see recommended
readings at the end of this file).</p>

<p> </p>

<p> </p>

<p><img src="Image23.gif" width="96" height="47"></p>

<p><b>Fuel quantity gauge:</b> the red LED’s at the bottom
will light if the fuel level is below <span lang="es">160 kg in either tank.</span></p>

<p> </p>

<p><b><span lang="es">Air temperature </span>gauge:</b> <span lang="es">pressing
the button at the lower left part will cycle between OAT and TAT. On the right
side, the TAS is shown.</span></p>

<p> </p>

<p> </p>

<p><img src="Image24.gif" width="46" height="63"></p>

<p><b>Fuel quantity gauges: </b>This is another deviation from
the real plane. In the real ATR, these are fuel temperature
gauges, but such variable does not exist (please correct me if
I’m wrong) in FS2002. So I used them for an additional fuel
level indicator, also with warning light below 10% level.</p>

<p> </p>

<p> </p>

<p><img src="Image25.gif" width="79" height="64"></p>

<p><b>Oil gauges:</b> the red LED’s will illuminate if low
oil pressure.</p>

<p> </p>

<p> </p>

<p><img src="Image26.gif" width="75" height="92"></p>

<p><b>Trim indicators:</b> For some reason, when choosing a new
aircraft in FS2002, the elevator trim is set to an extreme nose
down attitude. It is recommended to pause the simulation to
change your aircraft. This gauge can be used to check that the
elevator trim is in a reasonable position before returning to
normal simulation (an, of course, to</p>

<p>check correct trims before takeoff). Normal values for the
provided air file are in the range 0 to 0.5 positive elevator
trim.</p>

<p> </p>

<p> </p>

<p><img src="Image27.gif" width="204" height="70"></p>

<p><b>AFCS display:</b> contains information about the
autopilot’s status.</p>

<p> </p>

<p> </p>

<p><img src="Image28.gif" width="385" height="92"></p>

<p><b>AFCS controls:</b> Controls all functions of the autopilot<span lang="es">.
</span>There are four knobs to adjust course (only CRS1 can be
adjusted), heading and altitude hold variables. <span lang="es">Note that in
some systems, CRS and HDG (and sometimes ALT and IAS) will vary in increments of
10 instead of 1 by 1. This is a FS2002 bug, see the "control acceleration bug"
section.</span></p>

<p>The NOSE UP/NOSE DN wheel <span lang="es">has two functions: when VS mode is
engaged, </span>will adjust <span lang="es">the vertical speed</span>.
<span lang="es">When IAS mode is engaged, will control the airspeed.</span></p>

<p><span lang="es"> </span>Note that you can operate these
knobs and wheel by clicking on them, but also if you have a wheel
mouse, moving the wheel when the cursor is over them will have
the same effect. (This seem to work only in FS2002 *.cab gauges)</p>

<p>There are three buttons to control the autopilot’s main
functions (AP, YD and <span lang="es">CPL). CPL is just a dummy button in this
panel ,as the function is not supported by FS. When the AP button is presssed,
the both the autopilot and the yaw damper are automatically engaged. Pressing
the YD button will then disengage both autopilot and yaw damper.</span></p>

<p>Four buttons control the airplane’s heading: HDG, NAV,
APP and BC. Please note that the BC function does not seem to
work at all in FS2002, and has some unwanted behaviour when the
APP function is activated. I believe this is a particular
behaviour (bug?) of FS2002 rather than a bug in my gauge
(feedback will be highly appreciated).</p>

<p>Three buttons control the plane’s vertical speed: IAS, VS
and ALT.</p>

<p>The IAS hold provided <span lang="es">behaves like</span> the real aircraft’s IAS
hold function. <span lang="es">L</span>ike many <span lang="es">other </span>aircrafts, which will act on the plane’s
pitch to maintain the pre-set airspeed.<span lang="es"> The engines are not
controlled by this function at all. </span> The airplane will climb
to reduce airspeed, or will dive to increase it. You can control
the aircraft’s climb or descent by setting a desired
airspeed and then adjusting the power levers until the desired VS
is reached. <span lang="es">When this button is pressed, the aicraft will try to
keep the current airspeed, this airspeed can be then raised or lowered by means
of the nose up/down wheel.</span></p>

<p>IAS hold function will automatically de-activate when the
preset altitude is reached. Try to avoid sudden changes in power
or in IAS hold speed knob while IAS button is illuminated, or you
will run out of sickness bags ;-). Be also aware that, while IAS function is
active, there seems to be a bug (?) which, in case you try to operate the speed
selection knob, makes it change in steps of 50 kts instead of 1 by 1.
<span lang="es">This is a FS2002 bug, see the "control acceleration bug" section.</span></p>

<p><span lang="es">With IAS or VS modes active, when the preselected altitude is
reached, the autopilot will go automatically to ALT mode. </span></p>

<p><span lang="es">If the ALT button is pressed before the selected altitude is
reached, the aircraft will stop climb and hold the current altitude. If VS or
IAS is pressed,a the aircraft will continue climbing to the preset altitude.</span></p>

<p><span lang="es">Note: The VS, IAS and ALT functions do not match at all with
the standard functions provided in fs2002, and have been custom made to behave
like the real aircraft. Due to this, if you activate alt hold by means of a
keyboard stroke, the behaviour explained above may vary. It is recommended to
operate these functions by mouse clicking instead.</span></p>

<p> </p>

<p><img border="0" src="ATR%20422.gif" width="105" height="243"></p>

<p><b>Condition levers</b> (throttle panel): Unlike the default
FS2002 aircrafts, the ATR does not have separate fuel and prop
levers. The condition levers in the ATR<span lang="es">7</span>2-500 have four positions: MAX RPM,
AUTO, FTR and FUEL S.O. The AUTO position will adjust the propeller rpm
automatically <span lang="es">to 100% or 82% according to the PWR MGT selector.
The MAX position will bypass this function and set rpm to 100%. To shut down the
engines, move the levers to FTR position and further down to FUEL SO position.
</span></p>

<p><span lang="es">Note1: although the real plane does not allow manual control
of the prop rpm, I have provided a way to cheat this, for those simmers who want
to have manual control: Place the condition levers in FTR position. The
propellers will feather, but afterwards the propellers can be controlled by a
joystick or keyboard.</span></p>

<p><span lang="es">Note2: If you have a joystick axis assigned to propeller
control, it must be placed in its minimum position for this gauge to work
properly. Otherwise, the gauge will fight agains the joystic setting and the rpm
will continously go up and down. this is not a bug. Some analog joysticks may
need to deactivate this assignment for the gauge to work properly.</span></p>

<p><span lang="es">Note 3: When loading an aircraft, the levers will default to
AUTO position. </span></p>

<p> </p>

<p><img src="Image30.jpg" width="84" height="67"></p>

<p><b>Idle gate </b>(throttle panel): Pull for ground idle, push
for flight idle.</p>

<p><img src="Image31.jpg" width="360" height="81"></p>

<p><b>Radio stack</b> (throttle panel): contains all except the
NAV radios, which are located beside the AFCS display. Note that
the ADF radio has been repeated to make it visually similar to
the real radio stack.<span lang="es"> The radios must be TURNED ON before use!!</span></p>

<p><span lang="es">Note: the COM2 radio cannot be programmed in xml code due to
a FS2002 bug. This panel uses the default King Air COM2 radio (which is included
in the Professional edition only) due to this problem. Therefore, the Standard
edition users will not have a working COM2 radio. Thie is the only known
incompalitility (so far) specific to the standard edition. Please do not ask me
to send you this gague: is is copyrighted by Microsoft.</span></p>

<p> </p>

<p><img src="Image32.jpg" width="79" height="130"></p>

<p><b>Trim controls</b> (throttle panel).</p>

<p> </p>

<p> </p>

<p><img src="Image33.jpg" width="38" height="38"></p>

<p><b>Throttle panel toggle icon</b> (throttle panel): Has been
provided also in the throttle panel itself, to allow closing the
panel when the icons on the main panel are covered. Top right
corner.</p>

<p> </p>

<p><span lang="es"><b>Overhead panel:</b> Most buttons in the real panel have
been provided, but many of them are jsut dummy switches with no function (although
they can be useful if you are trying to simulate some serious procedures). The
elements that have a function are identified below:</span></p>

<p><img border="0" src="overhead.jpg" width="820" height="610"></p>

<p> </p>

<p> </p>

<p><img src="Image37.jpg" width="120" height="88"></p>

<p><b>Engine starters and propeller brake panel</b> (overhead
panel): There is a selector switch with 5 positions: START A+B,
START B, START A, CRANK, OFF & ABORT START, and CONT.
RELIGHT. Normal procedure when starting an engine for the first
time after a long stop is first to crank it for a moment, then
select START A+B and press the starter button. If the engine has
not had a long period of inactivity, START A or B can be selected
without prior cranking. To simulate this circumstance, the
starter buttons will display a FAULT indication if this procedure
is not adhered to (can be reset by placing the selector in OFF
position). The FAULT indication will also illuminate if the
starters are activated with the condition lever out of FUEL
SHUTOFF position. The FAULT indication will not appear if you
start from the keyboard, only when using mouse-clicks on the
gauge (thus allowing for Ctrl + E start). </p>

<p>Procedure to normally start an engine is activate starter,
wait for 10% NH, then bring condition lever to FEATHER, wait 10
seconds and then give FULL RPM. The starter will de-activate
automatically when ignition is detected.</p>

<p>At the bottom of this panel there is the propeller brake
switch and indicators. The ATR 42 is provided with a propeller
brake on the starboard prop (no.2), allowing it to operate in
"hotel mode", the engine generating electrical power
while the propeller is stopped, and thus eliminating the need for
an APU. </p>

<p>The propeller brake provided in this gauge will actually not
stop the propeller from spinning, it will just make the rpm
indication go to zero, so don’t look out, please ;-).
I’ve made several attempts to build a working propeller
brake, the only result being FS and Windows crashing in various flavours (if somebody has found out how to stop a turboprop
airscrew in FS while maintaining the gas producer turbine
running, I’d really appreciate the information). </p>

<p>The propeller brake switch must not be touched if the green
READY indicator is not illuminated, or if the red UNLOCK
indicator is on. Place engine #2 in feather position and power at
ground idle to do it. A blue PROP BRAKE indicator will tell you
that the brake is activated. Don’t try to take off in this
condition: in order to simulate the lack of thrust from a stopped
propeller, its condition lever will insist on staying in feather
position.</p>

<p>Normal procedure for engine start is: Activate prop. brake;
start engine #2; let passengers in and do whatever you need
before taxi; de-activate prop. brake; bring condition lever no.2
to full rpm; start taxiing; start engine #1 while taxiing. (On a
real ATR, the thrust from one only engine at ground idle is
enough for taxiing, not in FS due to the well known "sticky
tires" effect).</p>

<p> </p>

<p><span lang="es"><u><b>Spoilerons</b></u></span></p>

<p>You may notice that, although there is no spoilers gauge,
spoilers will deploy if activated by keyboard command. This is a
side effect of how FS handles spoilerons: The real ATR has
spoilerons to assist in manoeuvring at low speed, but has no
airbrakes (spoilers). FS doesn’t like spoilerons without
spoilers, so there they are. If you experience lack of lift or
excessive drag, have a look at your airplane from an external
view and make sure you didn’t accidentally extend them.</p>

<p> </p>

<p><b><u>Sounds</u></b></p>

<p>The sounds included with this aircraft have been recorded inside a Dash-8, which
is similar enough to the ATR sounds.</p>

<p>Some explanation about the sound.cfg: Simplifying it
a lot, the sound of a real turboprop engine could be considered
as caused by four individual sounds: 1-A jet whine sound, which
has both its pitch and volume depending on the gas producer rpm
(NH). 2-A propeller sound, which has its pitch depending only on
the propeller rpm (NP) and its volume depending on the torque.
3-Another component would be caused by the resonance of each
blade, the pitch of it being always the same, and volume changing
as a function of both torque and rpm. 4-The last component would
be a sound induced by the air friction, turbulences, etc.
produced by the blades’ linear speed, its pitch and sound
depending on several factors, primarily on the blade tip’s
Mach number.</p>

<p>What the default MS sound.cfg provides is a reasonable modelling
of component 1, but all the other components are mixed up into an
awful result: The propeller sound (which they categorize as
combustion sound!!) will vary its pitch according to the power
setting, while the propeller rpm will have no influence on it!
So, if you fix a certain propeller rpm and increase power while
in flight, you will hear the propellers speeding up, even if they
maintain the rpm unaffected. Also, you will hear them slowing
down when you decrease power. But if you look at the propeller
rpm gauges, they will not vary in flight (the rpm will only show
a variation when the plane is almost stopped on the ground or
when the props are feathered). This is very unrealistic. </p>

<p>As quite a few simmers have correctly pointed out, MS seems to
have forgotten we are dealing with constant speed propellers when modelling the sound, but they have provided the tools to improve
the situation in their SDK’s. This is what has been modelled in this
aircraft. Please remember: the propeller sound frequency will not vary according
to the power setting. This is not a bug; it's how real planes sound like.</p>

<p>You'll also notice that there is no flaps sound. This is intentional, the
flaps can not e heard at the cabin in the real plane.</p>

<p><u><b><span lang="es">Known problems and limitations</span></b></u></p>

<p><span lang="es">- In some systems, HDG, CRS (and eventually altitude and
speed) cannot be selected in increments of 1 unit, but rather the gauges will
insist in jumping in 10 units increments. Thus, the heading will display 000,
010, 020, etc. but it will not be possible to select intermediate figures, as
012. This is a known FS2002 problem, which can appear in this aircraft due to
the custom functions which are built in the gauges. To solve it, download and
install FSUIPC (made by Peter Dowson, and available at
<a href="http://www.schiratti.com/dowson">www.schiratti.com/dowson</a>), then
activate the option "Fix control acceleration" in the Technical section.. This
module has many other features which make it highly recommendable. See the
documentation in this site for additional explanation.</span></p>

<p><span lang="es">- The autopilot flags in the ADI can sometimes appear and
disappear at random. This is a known bug, I'm investigating how to solve it.</span></p>

<p><span lang="es">- If you find that a lot of gauges are missing in the panels,
the reason is that you have extracted the xml and bmp files which came inside
the following cab files: FSC.ATR.fl, FSC.ATR.ovhd, FSC.ATR.radios. It is a very
common mistake. These files are to be coiped inot the \gauges folder, without
extracting their contents. Windows ME and XP can display these files as if they
were folders, which can contribute to this mistake.</span></p>

<p><span lang="es">- The COM2 radio will not be operative if you have FS2002
standard edition. I tried to program a custom one, but it is not possible due to
a bug in FS2002. So, I had to use the stock one from the Beech King Air, which
is only included with the Pro version. </span></p>

<p><span lang="es">- If you notice that your radios are dead, please remember
that each one is provided with an on/off switch that needs to be turned on
before use, same as in a real aircraft.. The radios are set to off every time
the aircraft is reloaded.</span></p>

<p> </p>

<p><b><u>Disclaimer</u></b></p>

<p>1-These files will not harm your PC. 2-If you are not sure of
how to install them, please don’t do it, as you may harm
yourself your PC. 3-If you are confident that you can do it, then
do it at your own risk. 4-If you think these files have harmed
your PC in any way, you are wrong, 2 applies. I accept no
responsibility.</p>

<p> </p>

<p><u><b>REPAINTS<br>
</b></u>If you want to create and distribute a repaint for this aircraft, please
do it as follows:<br>
<br>
- <b>Option 1</b>: If you create a textures-only package, you dont need my
permission, the files files made by you are yours. Just remember to write an
aircraft.cfg file <span lang="es">to match</span> the new livery, and to provide a link to my
archive.
Don't forget to identify the files as yours.<br>
<br>
- <b>Option 2:</b> If you wish to distribute a full package aircraft + textures,
please note: The docs folder must remain unchanged, and must be included in the
release. You must include a file called readme.txt with your name, e-mail
address or other contact information, and a list specifying which files are
belonging to my original release, and which files have been created or modified
by yourself. At the end of this file, write "TEXT OF THE README FILE FROM THE
ORIGINAL AUTHOR:", then copy the entire text of this file you are reading now,
including my copyright information (of course my copyright excludes those
created by you). Please do not include my panel in a different aircraft. You
must instruct the end user to contact you in case of problems with the plane; I
will not support any other release than this ATR72-500 EC-HBY in Iberia Regional
- Air Nostrum livery. Please send me a link to your repaint.<br>
<br>
<br>
<u><b>COPYRIGHT AND SO ON<br>
</b></u>This aircraft is released as Freeware. Copyright F. Sбnchez-Castaсer
Gonzбlez. As freeware you are permitted to distribute this archive subject to
the following conditions:<br>
- The archive must be distributed WITHOUT ANY MODIFICATION to the contents of
the archive. Redistributing this archive with any files added, removed or
modified is prohibited, except as specified under REPAINTS above.<br>
- The inclusion of any individual file from this archive in another archive
without the prior permission of the author is prohibited<br>
- No charge may be made for this archive other than that to cover the cost of
its distribution. If a fee is charged it must be made clear to the purchaser
that the archive is freeware and that the fee is to cover the distributor's
costs of providing the archive. </p>

<p>The file manatr725.zip and its contents is cpoyright by Werner Schott, see
the included readme file.<br>
 </p>

<p><b><u>Acknowledgements:</u></b></p>

<p>I’d like to express my sincere thanks to:</p>

<p><span lang="es">Luca Piccini, he is an ATR pilot form Rome, Italy who has
hugely contributed to this project and continously encouraged me for improvement.</span></p>

<p>Gabriel Niсo Vizcaya, who kindly offered <span lang="es">h</span>imself for testing the
flight model.<span lang="es"> He is Flight officer in the EC-HBY depicted.  </span></p>

<p><span lang="es">Werner Schott, for his fine manuals and checklists.</span></p>

<p><span lang="es">Scott Thomas, Milton Shupe, Tomas Foosn<font face="Times New Roman">жs,
George Bernard, Daniel Pimentel, Stefano Gazich Valseratti.  They have
kindly tested the beta verion of this aircraft and thanks to them the final
release has been greatly improved.</font></span></p>

<p>Ron Freimuth, for the useful information he sent me on
flight dynamics and turboprop parameters.</p>

<p>Matt Zagoren, for his very useful ATR42 documentation.</p>

<p>Laurent Michelot, for his advices regarding panel design.</p>

<p>Chris File, for his patience to teach how to properly get
something out of Gmax.</p>

<p>Dai Griffiths for his superb gauge design tutorials.</p>

<p>Arne Bartels, for his huge contribution to gauge design and
his ability and willingness to share his knowledge.</p>

<p>Karl R Pettersen<span lang="es">, for his advices in gauge design.</span></p>

<p>All participants in the forums at <a
href="http://www.flightsim.com/">www.flightsim.com</a>, <a
href="http://www.avsim.com/">www.avsim.com</a>, <a
href="http://www.freeflightdesign.com/">www.freeflightdesign.com</a>,
<a href="http://www.avhistory.org/">www.avhistory.org</a>, and
all other valuable fs-related sites.</p>

<p> </p>

<p><b><u>Recommended reading:</u></b></p>

<p>Highly recommended: "ATR42 Performance, Procedures and
Limitations", by Matt Zagoren. A set of three pdf documents
with extensive information about this aircraft, which will allow
a highly realistic flying. Available at <a
href="http://www.flightsim.com/">www.flightsim.com</a> as
at42perf.zip. The documents are meant for the ATR <span lang="es">4</span>2-300, but will still give a
good guidance for the <span lang="es">7</span>2-500.</p>

<p>Copyright © 2000-200<span lang="es">3</span> F. Sбnchez-Castaсer</p>
</body>
</html>
33179-TAROM-ATR42-500.zip
| Имя файла | Дата | Размер |
|---|---|---|
| TAROM ATR42-500/ | 13.10.2010 09:22 | |
| TAROM ATR42-500/Aircraft/ | 13.10.2010 09:22 | |
| TAROM ATR42-500/Aircraft/ATR 42-500 TAROM/ | 13.10.2010 09:22 | |
| TAROM ATR42-500/Aircraft/ATR 42-500 TAROM/Aircraft.cfg | 30.05.2007 00:47 | 10 KB |
| TAROM ATR42-500/Aircraft/ATR 42-500 TAROM/Aircraft.cfg.bak | 26.05.2007 15:28 | 11 KB |
| TAROM ATR42-500/Aircraft/ATR 42-500 TAROM/atr42_500.air | 27.05.2007 00:45 | 15 KB |
| TAROM ATR42-500/Aircraft/ATR 42-500 TAROM/Checklist.txt | 27.05.2007 00:45 | 9 KB |
| TAROM ATR42-500/Aircraft/ATR 42-500 TAROM/model/ | 13.10.2010 09:22 | |
| TAROM ATR42-500/Aircraft/ATR 42-500 TAROM/model/atr42500.mdl | 27.05.2007 00:45 | 865 KB |
| TAROM ATR42-500/Aircraft/ATR 42-500 TAROM/model/Model.cfg | 27.05.2007 00:45 | 27 B |
| TAROM ATR42-500/Aircraft/ATR 42-500 TAROM/panel/ | 13.10.2010 09:22 | |
| TAROM ATR42-500/Aircraft/ATR 42-500 TAROM/panel/727pg.HGHB_CRS.gau | 30.05.2007 00:49 | 82 KB |
| TAROM ATR42-500/Aircraft/ATR 42-500 TAROM/panel/727pg.HGHB_HDG.gau | 30.05.2007 00:49 | 60 KB |
| TAROM ATR42-500/Aircraft/ATR 42-500 TAROM/panel/a300BGT-FuelSwitch1.gau | 30.05.2007 00:49 | 13 KB |
| TAROM ATR42-500/Aircraft/ATR 42-500 TAROM/panel/a300BGT-FuelSwitch2.gau | 30.05.2007 00:49 | 13 KB |
| TAROM ATR42-500/Aircraft/ATR 42-500 TAROM/panel/ASW28_Compass.gau | 30.05.2007 00:49 | 176 KB |
| TAROM ATR42-500/Aircraft/ATR 42-500 TAROM/panel/ATR-42.APread.gau | 30.05.2007 00:48 | 44 KB |
| TAROM ATR42-500/Aircraft/ATR 42-500 TAROM/panel/ATR-42a.autothrottle.gau | 30.05.2007 00:48 | 9 KB |
| TAROM ATR42-500/Aircraft/ATR 42-500 TAROM/panel/ATR-42a.reverser.gau | 30.05.2007 00:48 | 72 KB |
| TAROM ATR42-500/Aircraft/ATR 42-500 TAROM/panel/atr.airspeed.gau | 30.05.2007 00:49 | 48 KB |
| TAROM ATR42-500/Aircraft/ATR 42-500 TAROM/panel/atr.altim1.gau | 30.05.2007 00:49 | 31 KB |
| TAROM ATR42-500/Aircraft/ATR 42-500 TAROM/panel/atr.altim3.gau | 30.05.2007 00:49 | 242 KB |
| TAROM ATR42-500/Aircraft/ATR 42-500 TAROM/panel/atr.ap.gau | 30.05.2007 00:48 | 86 KB |
| TAROM ATR42-500/Aircraft/ATR 42-500 TAROM/panel/atr.aperk2.gau | 30.05.2007 00:48 | 76 KB |
| TAROM ATR42-500/Aircraft/ATR 42-500 TAROM/panel/atr.control.gau | 30.05.2007 00:48 | 20 KB |
| TAROM ATR42-500/Aircraft/ATR 42-500 TAROM/panel/atr.flaps.gau | 30.05.2007 00:48 | 119 KB |
| TAROM ATR42-500/Aircraft/ATR 42-500 TAROM/panel/atr.fuel_left.gau | 30.05.2007 00:48 | 36 KB |
| TAROM ATR42-500/Aircraft/ATR 42-500 TAROM/panel/atr.fuel_right.gau | 30.05.2007 00:48 | 36 KB |
| TAROM ATR42-500/Aircraft/ATR 42-500 TAROM/panel/atr.rmi.gau | 30.05.2007 00:48 | 137 KB |
| TAROM ATR42-500/Aircraft/ATR 42-500 TAROM/panel/atr.verspeed.gau | 30.05.2007 00:48 | 34 KB |
| TAROM ATR42-500/Aircraft/ATR 42-500 TAROM/panel/atr72.bmp | 30.05.2007 00:48 | 2 MB |
| TAROM ATR42-500/Aircraft/ATR 42-500 TAROM/panel/atr72ped.bmp | 30.05.2007 00:48 | 502 KB |
| TAROM ATR42-500/Aircraft/ATR 42-500 TAROM/panel/BOEING767-300.HGHB_TOGA.gau | 30.05.2007 00:48 | 89 KB |
| TAROM ATR42-500/Aircraft/ATR 42-500 TAROM/panel/cessna208.gau | 30.05.2007 00:49 | 3 MB |
| TAROM ATR42-500/Aircraft/ATR 42-500 TAROM/panel/FPDA_aircond_switch.gau | 30.05.2007 00:49 | 16 KB |
| TAROM ATR42-500/Aircraft/ATR 42-500 TAROM/panel/fpda_boeing_callout.gau | 30.05.2007 00:49 | 16 KB |
| TAROM ATR42-500/Aircraft/ATR 42-500 TAROM/panel/fpda_gear_sound.gau | 30.05.2007 00:49 | 14 KB |
| TAROM ATR42-500/Aircraft/ATR 42-500 TAROM/panel/FPDA_Gear_Wind.gau | 30.05.2007 00:49 | 9 KB |
| TAROM ATR42-500/Aircraft/ATR 42-500 TAROM/panel/fpda_trim_sound.gau | 30.05.2007 00:49 | 10 KB |
| TAROM ATR42-500/Aircraft/ATR 42-500 TAROM/panel/ID_767_APWarn.gau | 30.05.2007 00:49 | 103 KB |
| TAROM ATR42-500/Aircraft/ATR 42-500 TAROM/panel/loENGINE.gau | 30.05.2007 00:49 | 453 KB |
| TAROM ATR42-500/Aircraft/ATR 42-500 TAROM/panel/Panel.cfg | 30.05.2007 00:49 | 6 KB |
| TAROM ATR42-500/Aircraft/ATR 42-500 TAROM/panel/pg.mdxx.cd.alt.gau | 30.05.2007 00:49 | 42 KB |
| TAROM ATR42-500/Aircraft/ATR 42-500 TAROM/panel/pg.mdxx.cd.spd.gau | 30.05.2007 00:49 | 42 KB |
| TAROM ATR42-500/Aircraft/ATR 42-500 TAROM/panel/RealCRT.NDs.gau | 30.05.2007 00:49 | 232 KB |
| TAROM ATR42-500/Aircraft/ATR 42-500 TAROM/panel/rp733_adi_efiss.gau | 30.05.2007 00:49 | 752 KB |
| TAROM ATR42-500/Aircraft/ATR 42-500 TAROM/panel/Signs1.gau | 30.05.2007 00:49 | 28 KB |
| TAROM ATR42-500/Aircraft/ATR 42-500 TAROM/panel/sm_Stall_Warn.gau | 30.05.2007 00:49 | 84 KB |
| TAROM ATR42-500/Aircraft/ATR 42-500 TAROM/panel/TA747-400.NDSW.gau | 30.05.2007 00:49 | 24 KB |
| TAROM ATR42-500/Aircraft/ATR 42-500 TAROM/panel/Thumbs.db | 27.05.2007 00:45 | 72 KB |
| TAROM ATR42-500/Aircraft/ATR 42-500 TAROM/Sound/ | 13.10.2010 09:22 | |
| TAROM ATR42-500/Aircraft/ATR 42-500 TAROM/Sound/sound.cfg | 27.05.2007 00:45 | 34 B |
| TAROM ATR42-500/Aircraft/ATR 42-500 TAROM/texture.ATC/ | 13.10.2010 09:22 | |
| TAROM ATR42-500/Aircraft/ATR 42-500 TAROM/texture.ATC/ala_l.bmp | 27.05.2007 00:45 | 2 KB |
| TAROM ATR42-500/Aircraft/ATR 42-500 TAROM/texture.ATC/ala_t.bmp | 27.05.2007 00:45 | 1 MB |
| TAROM ATR42-500/Aircraft/ATR 42-500 TAROM/texture.ATC/cabina2_t.bmp | 27.05.2007 00:45 | 171 KB |
| TAROM ATR42-500/Aircraft/ATR 42-500 TAROM/texture.ATC/cabina_l.bmp | 27.05.2007 00:45 | 2 KB |
| TAROM ATR42-500/Aircraft/ATR 42-500 TAROM/texture.ATC/cabina_t.bmp | 27.05.2007 00:45 | 4 MB |
| TAROM ATR42-500/Aircraft/ATR 42-500 TAROM/texture.ATC/cargodoor.bmp | 27.05.2007 00:45 | 128 KB |
| TAROM ATR42-500/Aircraft/ATR 42-500 TAROM/texture.ATC/ceiling.bmp | 27.05.2007 00:45 | 128 KB |
| TAROM ATR42-500/Aircraft/ATR 42-500 TAROM/texture.ATC/floor.bmp | 27.05.2007 00:45 | 512 KB |
| TAROM ATR42-500/Aircraft/ATR 42-500 TAROM/texture.ATC/fuselaje2_l.bmp | 27.05.2007 00:45 | 2 KB |
| TAROM ATR42-500/Aircraft/ATR 42-500 TAROM/texture.ATC/fuselaje2_t.bmp | 27.05.2007 00:45 | 64 KB |
| TAROM ATR42-500/Aircraft/ATR 42-500 TAROM/texture.ATC/fuselaje_l.bmp | 27.05.2007 00:45 | 1 MB |
| TAROM ATR42-500/Aircraft/ATR 42-500 TAROM/texture.ATC/fuselaje_t.bmp | 27.05.2007 00:45 | 4 MB |
| TAROM ATR42-500/Aircraft/ATR 42-500 TAROM/texture.ATC/morro_l.bmp | 27.05.2007 00:45 | 1 MB |
| TAROM ATR42-500/Aircraft/ATR 42-500 TAROM/texture.ATC/morro_t.bmp | 27.05.2007 00:45 | 4 MB |
| TAROM ATR42-500/Aircraft/ATR 42-500 TAROM/texture.ATC/passdoor.bmp | 27.05.2007 00:45 | 128 KB |
| TAROM ATR42-500/Aircraft/ATR 42-500 TAROM/texture.ATC/prop.bmp | 27.05.2007 00:45 | 85 KB |
| TAROM ATR42-500/Aircraft/ATR 42-500 TAROM/texture.ATC/prop6.bmp | 27.05.2007 00:45 | 171 KB |
| TAROM ATR42-500/Aircraft/ATR 42-500 TAROM/texture.ATC/Thumbs.db | 27.05.2007 00:45 | 42 KB |
| TAROM ATR42-500/Aircraft/ATR 42-500 TAROM/texture.ATC/window_t.bmp | 27.05.2007 00:45 | 8 KB |
| TAROM ATR42-500/Aircraft/ATR 42-500 TAROM/Thumbs.db | 27.05.2007 00:45 | 59 KB |
| TAROM ATR42-500/Aircraft/fsfsconv/ | 13.10.2010 09:22 | |
| TAROM ATR42-500/Aircraft/fsfsconv/ATR-sound/ | 13.10.2010 09:22 | |
| TAROM ATR42-500/Aircraft/fsfsconv/ATR-sound/732BELLY.wav | 27.05.2007 00:44 | 813 KB |
| TAROM ATR42-500/Aircraft/fsfsconv/ATR-sound/732WINGSCRAPE.wav | 27.05.2007 00:44 | 239 KB |
| TAROM ATR42-500/Aircraft/fsfsconv/ATR-sound/afgys-flap.wav | 27.05.2007 00:44 | 174 KB |
| TAROM ATR42-500/Aircraft/fsfsconv/ATR-sound/afgys-idle.wav | 27.05.2007 00:44 | 784 KB |
| TAROM ATR42-500/Aircraft/fsfsconv/ATR-sound/afgys-shut.wav | 27.05.2007 00:44 | 931 KB |
| TAROM ATR42-500/Aircraft/fsfsconv/ATR-sound/afgys-start1.wav | 27.05.2007 00:44 | 866 KB |
| TAROM ATR42-500/Aircraft/fsfsconv/ATR-sound/afgys-start2.wav | 27.05.2007 00:44 | 4 MB |
| TAROM ATR42-500/Aircraft/fsfsconv/ATR-sound/afgys-taxi.wav | 27.05.2007 00:44 | 704 KB |
| TAROM ATR42-500/Aircraft/fsfsconv/ATR-sound/afgys-xclimb.wav | 27.05.2007 00:44 | 286 KB |
| TAROM ATR42-500/Aircraft/fsfsconv/ATR-sound/afgys-xidle.wav | 27.05.2007 00:44 | 500 KB |
| TAROM ATR42-500/Aircraft/fsfsconv/ATR-sound/afgys-xshut.wav | 27.05.2007 00:44 | 2 MB |
| TAROM ATR42-500/Aircraft/fsfsconv/ATR-sound/afgys-xstart1.wav | 27.05.2007 00:44 | 864 KB |
| TAROM ATR42-500/Aircraft/fsfsconv/ATR-sound/afgys-xstart2.wav | 27.05.2007 00:44 | 4 MB |
| TAROM ATR42-500/Aircraft/fsfsconv/ATR-sound/afgys-xtaxi.wav | 27.05.2007 00:44 | 2 MB |
| TAROM ATR42-500/Aircraft/fsfsconv/ATR-sound/avionics.wav | 27.05.2007 00:44 | 897 KB |
| TAROM ATR42-500/Aircraft/fsfsconv/ATR-sound/baapdis.wav | 27.05.2007 00:44 | 53 KB |
| TAROM ATR42-500/Aircraft/fsfsconv/ATR-sound/BAOVER.WAV | 27.05.2007 00:44 | 86 KB |
| TAROM ATR42-500/Aircraft/fsfsconv/ATR-sound/BMFLAPS.wav | 27.05.2007 00:44 | 174 KB |
| TAROM ATR42-500/Aircraft/fsfsconv/ATR-sound/bmgeardn.wav | 27.05.2007 00:44 | 132 KB |
| TAROM ATR42-500/Aircraft/fsfsconv/ATR-sound/bmgearup.wav | 27.05.2007 00:44 | 132 KB |
| TAROM ATR42-500/Aircraft/fsfsconv/ATR-sound/bnroll.wav | 27.05.2007 00:44 | 370 KB |
| TAROM ATR42-500/Aircraft/fsfsconv/ATR-sound/bnroll2.wav | 27.05.2007 00:44 | 390 KB |
| TAROM ATR42-500/Aircraft/fsfsconv/ATR-sound/can2t.wav | 27.05.2007 00:44 | 107 KB |
| TAROM ATR42-500/Aircraft/fsfsconv/ATR-sound/cbn2t.wav | 27.05.2007 00:44 | 107 KB |
| TAROM ATR42-500/Aircraft/fsfsconv/ATR-sound/f501.wav | 27.05.2007 00:45 | 1 MB |
| TAROM ATR42-500/Aircraft/fsfsconv/ATR-sound/f502.WAV | 27.05.2007 00:45 | 303 KB |
| TAROM ATR42-500/Aircraft/fsfsconv/ATR-sound/f504.WAV | 27.05.2007 00:45 | 303 KB |
| TAROM ATR42-500/Aircraft/fsfsconv/ATR-sound/f50apdis.wav | 27.05.2007 00:45 | 40 KB |
| TAROM ATR42-500/Aircraft/fsfsconv/ATR-sound/f50flaps.wav | 27.05.2007 00:45 | 67 KB |
| TAROM ATR42-500/Aircraft/fsfsconv/ATR-sound/f50gear.wav | 27.05.2007 00:45 | 583 KB |
| TAROM ATR42-500/Aircraft/fsfsconv/ATR-sound/f50gwarn.wav | 27.05.2007 00:45 | 240 KB |
| TAROM ATR42-500/Aircraft/fsfsconv/ATR-sound/f50roll.wav | 27.05.2007 00:45 | 71 KB |
| TAROM ATR42-500/Aircraft/fsfsconv/ATR-sound/f50shutdn.wav | 27.05.2007 00:45 | 5 MB |
| TAROM ATR42-500/Aircraft/fsfsconv/ATR-sound/f50stall.wav | 27.05.2007 00:45 | 87 KB |
| TAROM ATR42-500/Aircraft/fsfsconv/ATR-sound/f50start.wav | 27.05.2007 00:45 | 3 MB |
| TAROM ATR42-500/Aircraft/fsfsconv/ATR-sound/gearwarning.wav | 27.05.2007 00:45 | 111 KB |
| TAROM ATR42-500/Aircraft/fsfsconv/ATR-sound/kastall.wav | 27.05.2007 00:45 | 23 KB |
| TAROM ATR42-500/Aircraft/fsfsconv/ATR-sound/prop1.wav | 27.05.2007 00:45 | 450 KB |
| TAROM ATR42-500/Aircraft/fsfsconv/ATR-sound/prop2.wav | 27.05.2007 00:45 | 592 KB |
| TAROM ATR42-500/Aircraft/fsfsconv/ATR-sound/sound.cfg | 27.05.2007 00:45 | 6 KB |
| TAROM ATR42-500/Aircraft/fsfsconv/ATR-sound/touchc.wav | 27.05.2007 00:45 | 286 KB |
| TAROM ATR42-500/Aircraft/fsfsconv/ATR-sound/touchl.wav | 27.05.2007 00:45 | 41 KB |
| TAROM ATR42-500/Aircraft/fsfsconv/ATR-sound/touchr.wav | 27.05.2007 00:45 | 41 KB |
| TAROM ATR42-500/Aircraft/fsfsconv/ATR-sound/wind.wav | 27.05.2007 00:45 | 181 KB |
| TAROM ATR42-500/Aircraft/fsfsconv/ATR-sound/xcan2t.wav | 27.05.2007 00:45 | 107 KB |
| TAROM ATR42-500/Aircraft/fsfsconv/ATR-sound/xcbn2t.wav | 27.05.2007 00:45 | 107 KB |
| TAROM ATR42-500/Aircraft/Thumbs.db | 27.05.2007 00:44 | 36 KB |
| TAROM ATR42-500/Docs/ | 13.10.2010 09:22 | |
| TAROM ATR42-500/Docs/ATR 42.htm | 27.05.2007 00:45 | 29 KB |
| TAROM ATR42-500/Docs/ATR 421.gif | 27.05.2007 00:45 | 5 KB |
| TAROM ATR42-500/Docs/ATR 422.gif | 27.05.2007 00:45 | 11 KB |
| TAROM ATR42-500/Docs/Image16.gif | 27.05.2007 00:45 | 5 KB |
| TAROM ATR42-500/Docs/Image17.gif | 27.05.2007 00:45 | 7 KB |
| TAROM ATR42-500/Docs/Image18.gif | 27.05.2007 00:45 | 6 KB |
| TAROM ATR42-500/Docs/Image19.gif | 27.05.2007 00:45 | 2 KB |
| TAROM ATR42-500/Docs/Image2.jpg | 27.05.2007 00:45 | 9 KB |
| TAROM ATR42-500/Docs/Image20.gif | 27.05.2007 00:45 | 5 KB |
| TAROM ATR42-500/Docs/Image21.gif | 27.05.2007 00:45 | 5 KB |
| TAROM ATR42-500/Docs/Image22.gif | 27.05.2007 00:45 | 3 KB |
| TAROM ATR42-500/Docs/Image23.gif | 27.05.2007 00:45 | 3 KB |
| TAROM ATR42-500/Docs/Image24.gif | 27.05.2007 00:45 | 3 KB |
| TAROM ATR42-500/Docs/Image25.gif | 27.05.2007 00:45 | 3 KB |
| TAROM ATR42-500/Docs/Image26.gif | 27.05.2007 00:45 | 3 KB |
| TAROM ATR42-500/Docs/Image27.gif | 27.05.2007 00:45 | 4 KB |
| TAROM ATR42-500/Docs/Image28.gif | 27.05.2007 00:45 | 16 KB |
| TAROM ATR42-500/Docs/Image29.jpg | 27.05.2007 00:45 | 5 KB |
| TAROM ATR42-500/Docs/Image30.jpg | 27.05.2007 00:45 | 1 KB |
| TAROM ATR42-500/Docs/Image31.jpg | 27.05.2007 00:45 | 7 KB |
| TAROM ATR42-500/Docs/Image32.jpg | 27.05.2007 00:45 | 3 KB |
| TAROM ATR42-500/Docs/Image33.jpg | 27.05.2007 00:45 | 710 B |
| TAROM ATR42-500/Docs/Image34.jpg | 27.05.2007 00:45 | 2 KB |
| TAROM ATR42-500/Docs/Image35.jpg | 27.05.2007 00:45 | 2 KB |
| TAROM ATR42-500/Docs/Image36.jpg | 27.05.2007 00:45 | 2 KB |
| TAROM ATR42-500/Docs/Image37.jpg | 27.05.2007 00:45 | 2 KB |
| TAROM ATR42-500/Docs/overhead.jpg | 27.05.2007 00:45 | 186 KB |
| TAROM ATR42-500/Docs/Thumbs.db | 27.05.2007 00:45 | 104 KB |
| TAROM ATR42-500/Documentation/ | 13.10.2010 09:22 | |
| TAROM ATR42-500/Documentation/ATR_check.htm | 27.05.2007 00:45 | 12 KB |
| TAROM ATR42-500/Documentation/F16.gau.txt | 27.05.2007 00:45 | 47 B |
| TAROM ATR42-500/Documentation/Images/ | 13.10.2010 09:22 | |
| TAROM ATR42-500/Documentation/Images/ATR42-500 New Paint.jpg | 27.05.2007 00:45 | 558 KB |
| TAROM ATR42-500/Documentation/Images/ATR42-500 Old Paint.jpg | 27.05.2007 00:45 | 585 KB |
| TAROM ATR42-500/Documentation/Images/ATR42-500 Team.jpg | 27.05.2007 00:45 | 545 KB |
| TAROM ATR42-500/Documentation/Images/Cabin with passengers.jpg | 27.05.2007 00:45 | 170 KB |
| TAROM ATR42-500/Documentation/Images/Danish Air Transport.jpg | 27.05.2007 00:45 | 771 KB |
| TAROM ATR42-500/Documentation/Images/Flightdeck with Pilots.jpg | 27.05.2007 00:45 | 168 KB |
| TAROM ATR42-500/Documentation/Images/Main Panel with Yoke and GPS.jpg | 27.05.2007 00:45 | 208 KB |
| TAROM ATR42-500/Documentation/Images/Main Panel with Yoke and Radar.jpg | 27.05.2007 00:45 | 185 KB |
| TAROM ATR42-500/Documentation/Images/Night Panel.jpg | 27.05.2007 00:45 | 175 KB |
| TAROM ATR42-500/Documentation/Images/Stewardesse in cabin.jpg | 27.05.2007 00:45 | 132 KB |
| TAROM ATR42-500/Documentation/Images/Thumbs.db | 27.05.2007 00:45 | 59 KB |
| TAROM ATR42-500/Documentation/Images/Working Stewardesse in pantry.jpg | 27.05.2007 00:45 | 141 KB |
| TAROM ATR42-500/Documentation/panel_doc_radar.gif | 27.05.2007 00:45 | 23 KB |
| TAROM ATR42-500/Documentation/_File_ID & Install_readme.doc | 27.05.2007 00:45 | 818 KB |
| TAROM ATR42-500/effects/ | 13.10.2010 09:22 | |
| TAROM ATR42-500/effects/fx_ATR42_Exhaust.fx | 27.05.2007 00:45 | 1 KB |
| TAROM ATR42-500/readme.txt | 27.05.2007 01:13 | 9 KB |
| TAROM ATR42-500/Sound/ | 13.10.2010 09:22 | |
| TAROM ATR42-500/Sound/aircond.wav | 27.05.2007 00:45 | 265 KB |
| TAROM ATR42-500/Sound/Brakes_Sound.wav | 27.05.2007 00:45 | 67 KB |
| TAROM ATR42-500/Sound/click.wav | 27.05.2007 00:45 | 2 KB |
| TAROM ATR42-500/Sound/Fpda_A320_gear_1.wav | 27.05.2007 00:45 | 192 KB |
| TAROM ATR42-500/Sound/FPDA_Boeing_100ft.wav | 27.05.2007 00:45 | 10 KB |
| TAROM ATR42-500/Sound/FPDA_Boeing_10ft.wav | 27.05.2007 00:45 | 5 KB |
| TAROM ATR42-500/Sound/FPDA_Boeing_200ft.wav | 27.05.2007 00:45 | 9 KB |
| TAROM ATR42-500/Sound/FPDA_Boeing_20ft.wav | 27.05.2007 00:45 | 3 KB |
| TAROM ATR42-500/Sound/FPDA_Boeing_300ft.wav | 27.05.2007 00:45 | 9 KB |
| TAROM ATR42-500/Sound/FPDA_Boeing_30ft.wav | 27.05.2007 00:45 | 5 KB |
| TAROM ATR42-500/Sound/FPDA_Boeing_400ft.wav | 27.05.2007 00:45 | 10 KB |
| TAROM ATR42-500/Sound/FPDA_Boeing_40ft.wav | 27.05.2007 00:45 | 4 KB |
| TAROM ATR42-500/Sound/FPDA_Boeing_50ft.wav | 27.05.2007 00:45 | 5 KB |
| TAROM ATR42-500/Sound/FPDA_Trim_Sound.WAV | 27.05.2007 00:45 | 16 KB |
| TAROM ATR42-500/Sound/sign.wav | 27.05.2007 00:45 | 17 KB |
| TAROM ATR42-500/Sound/TALKDN.WAV | 27.05.2007 00:45 | 32 KB |
| TAROM ATR42-500/Sound/TALKUP.WAV | 27.05.2007 00:45 | 24 KB |
| TAROM ATR42-500/Thumbs.db | 27.05.2007 00:45 | 102 KB |
| avsim_su.diz | 14.10.2010 06:02 | 406 B |
| Итого: | 64 MB | |
ATR42-500 TAROM
| Rating: 5!
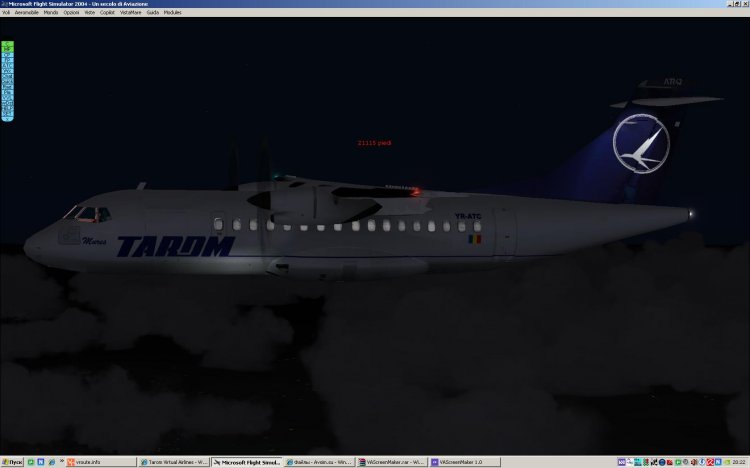
ATR42-500 TAROM
→ Size:
37 MB
→ Date:
15 years ago (14.10.2010 02:03)
→ Author:
Petrutiu
→ Approved by moderator:
Lenya69
→ License:
Freeware - Free version, Unlimited Distribution
→ Downloaded:
2761 time(s)