Boeing 575 Просмотр ZIP-архива
C26/C26_Readme.txt
FS2004 Pro Concept Design Private Jet Aircraft by Nick Pike. Version 2.6
------------------------------------------------------------------------

***************UPFRONT NOTES:***************


1) THIS PACKAGE is full stand-alone and does NOT require any previous updates. In fact, it would be a good idea to illiminate any previous versions.
2) START IN COCKPIT VIEW, else if the lights are turned on, the wing mist shows with a stationary aircraft. Also, all XML gauges will be properly set.
3) SOME PANEL SOUNDS may be heard initially, but allow a few seconds for the panel to 'settle down'.


Produced using FSDS2 (full Gmax effects).

[email protected]

for comments and suggestions, including constructive critism.

April 2004
------------


BE SURE TO READ THE INSTALL SECTION FOR CORRECT OPERATION.

I became frustrated by making existing aircraft as this does not allow any freedom to practise design 'flair', so I decided to design my own 'dream machine' that would require an enormous bank balance to own and operate.
The aircraft is a privately owned, 4 seater, fanjet engined type, fictitiously manufactured by Boeing and the version is a 575-200, codenamed 'Seagull-2.5'.
The two paint schemes are an imaginary house livery demonstrator and a private version.


Some of the features include,

1) Seperate lighting switches. Adjustable landing lights. Navigation lights, these types having illuminated lenses. Also steerable taxi, double flash strobe, beacon, true rotating beacon, logo lights and splash effects.
2) Ailerons, elevators and rudder. Spoilers/air brakes with rams. Leading edge slats that operate in conjunction with the proportional flaps. Lift dumpers that operate with the ailerons to improve banking. Improved banking speed.
3) Fully animated Pilot. Animated yokes and rudder pedals.
4) Full suspension landing gear with locking struts.
5) Rotating wheels. Steering nose wheel with aircraft in motion.
6) The opening canopy now uses higher strength Plexipex ESM, which allows for removal of the canopy frame to improve passenger all round views.
7) Realistic stationary/moving smoke, blue engine heat effect, wing mist and wingtip contrails effects appear with use of the 'I' key. Ensure you start in cockpit view. Starting in spot plane view with the lights on, prematurely shows the wing mist in the wrong position at the wrong time.
8) Virtual Cockpit with true illuminated gauges (in VC and Spot view) and conventional cockpit surround views including wings and engines with rotating fans.
9) Custom panel with many additional integrated pop-up windows. Mostly CRT with touch screen (mouse) technology. The vast majority of the panel gauges are coded using the new XML format (over 140). Automated functions such as auto take off, auto land, auto AP off and auto taxi speed (see details below). Also has working fuel dump gauges. Smaller, Landing 2D panel.
10) Panel sound set.
11) Reflective textures (polished aliminium).
12) If you get lost, there's a handy map on the co-pilots seat.
13) The registration number can be edited for the aircraft's spot plane and cockpit views and the ID can be edited for the cockpit view.
14) Improved/new gauges and improved flight dynamics from previous versions.
15) Engine hours log.
16) Moving sectional chart (British Isles only).
17) Rain spray effects.

To Install:
-----------

See seperate text file _C26_Install.txt.


NOTE: My monitor resolution is 1024x768 and I have not had problems with the gauge views. If you have a smaller resolution, you may not be able to see the gauges, especially, I believe, if 640x480.


Summary.
========

This is a lengthy document, but I advise you read it for a full understanding of the aircraft parameters. However, I shall give brief instructions here.

1) Landing. Fuel levels should be no more than 25%. Use the fuel dump gauge on the fuel management panel. The gear, flaps (and spoilers, if required) provide drag to control speed for landing. Aim for 120 kts when landing. Try auto land and observe how the aircraft performs.
2) Auto Land (AFL button). Set radios. Frequencies (obtained from the FS2004 map panel) can be entered using the radio panel. DME signal is required. All normal Autopilot functions are on. CENTER JOYSTICK for best results. Line up as well as possible. Speed and height at say 400 kts and 10 000 feet and about 30 miles out, click AFL. Sit back and watch as everything is automated. You will be left at about 15 kts on the runway. Click on autotaxi (on throttles gauge) to turn on and set the required taxi speed in the IAS window.
3) Takeoff. Use Left or Right brakes for fine steer control. Rotate about 130 kts. Press the 'I' key for some nice auto smoke features.
4 ) Auto takeoff (ATO button). The aircraft should be in the default state, with engines on idle and the parking brake on. Select the required MACH speed, altitude ( note the minimum height that can be set shown in the tooltip) and heading in the AP windows. Click ATO. The aircraft will end up at the chosen height, speed, heading, and the ATO will auto off. Normal AP functions will be active.
5) Abort Takeoff. For manual or auto takeoff. Set RTO (Rejected Takeoff) on the Autobrake. As the speed increases, this blue gauge will flash. Click this gauge before rotating, and the aircraft will come to a full stop with all related functions switched off.

View auto takeoff and landing in the spot plane view, with the auto smoke on (press the 'I' key) for some nice effects like realisic engine smoke, wing tip contrails on turns and higher G manouvers and wing top mist with AoA and below 5000 feet.

There are many features on this panel. Hover the mouse over all areas and look for tooltips. These label the functions and provide useful information where required. Click away and see what the many functions do. The moving sectional chart feature requies an additional file to be downloaded. C25mmap.zip , size 5Mb.


Flight and General Instructions.
--------------------------------

***A good general rule of thumb when using FS2004 is to start the flight sim with the default Cessna selected as this seems to set the sim up properly, and then select the C26 under Boeing. Also, if any views or pop-up windows look strange, or you change from say windowed to full-screen view, again select the Cessna and then return to this aircraft***.

***If using any of the auto features, including AP, it is a good idea to have your joystick set to neutral elevator and aileron. You can see the joystick positions in the appropriate trim gauges, and the joystick positions should be set to zero.***

NOTE: Autotrim is FOR MANUAL FLIGHT ONLY. It is automatically unavailable when using AutoPilot.
                  -----------------------

The vast majority of the gauges are in XML format and allow for a complex panel but with a very small file size, allowing for much faster download. XML format also allows for great flexability of gauge design. All gauges have tooltips by way of identification and supplying useful information. Most can be altered using the mousewheel.
One or two of these gauges are of an experimental nature, and although fully tested may give problems. Feedback is always welcome. Some experimentation by the flier first may prove useful when understanding the inner working of these more complex gauges.

Flight Instructions.
--------------------

Setting the speed too high at too low an altitude will make the aircraft unstable. This is true for any aircraft. Cruise between 35-45 000 feet. Also, a general rule at higher speeds is that the less fuel you have on board, the altitude can be lower for stable flight.

Pushback is achieved by clicking the Pushback gauge (see 'Issues' section regarding smoke auto off). The nose wheel will turn according to the swing direction.
For takeoff, rotate at approximately 120 kts. Short clicks on the left or right brakes can steer the aircraft when rolling along the runway.

The following is a full explanation regarding landing, but basically, deploy the flaps and gear (somewhat obviously), set speed to 120 kts and have no more than about 30% fuel. 25% is more ideal.

Fuel levels are important for landing. It is difficult to land with too much fuel on board, and ILS approach will be impaired. It is more realistic to land with no more than about 30% fuel and 25% is more ideal.
Landing speed should be set to 120 kts on autopilot.

Landing an ILS Approach.
-------------------------

Center joystick for best results.
Set ILS frequency on Nav 1 radio. A quick way was to use the rwyinfo gauge which has now been removed as it no longer works because of FS2004/ XP/ directx 9 issues.Obtain the radio frequencies from the FS2004 map view, and dial in the values in the radio panel. Set the speed on the AP to about 160 kts and deploy the flaps. Then deploy the gear. Set altitude to 3000 feet above the airport elevation to intercept the glideslope from below (definitely NOT from above - standard FS2004 procedure). Select approach button when HSI indicates you are receiving ILS signals (solid magenta bar first then magenta bug). A reassuring, self levelling slight bank indicates that the aircraft has locked onto ILS. Attempt to be fairly well lined up with the runway before you activate ILS. Reset speed to 140 kts before the ILS glide slope takes control, and then when under this control, reset speed to 120 kts for landing. Use the 25% fuel dump gauge on the fuel management panel to set an ideal landing weight.


Autoland Control.
-----------------

Select AFL in the auto pilot panel section about 30 miles out, where you should be at about 300 kts and 10 000 feet. You can, however, select this function after the localiser shows (solid magenta bar) but before a DME distance of 16 miles. This autoland feature will automatically control ALL necessary landing functions including flaps, spoilers, gear, heights, speeds and autobrake and leave you at a taxi speed of about 15 knots (which can be adjusted in the IAS window on the auto pilot). The auto taxi speed can be turned on by clicking in the appropriate area off the throttle gauge.
Autoland holds ILS down to the runway for a smooth landing, turns off the AP and sets reverse thrust. At approximately 15 kts, the autobrakes and remaining AP features are switched off.
Without auto taxi speed, and with the throttles set to 10%, the aircraft should taxi at about 15 knots. Manual adjustments of taxi speed can be made with the 'plus' / 'minus' feature under the mouse steer gauge.
You can turn autoland off at any time and normal ILS takes control, with the aircraft most probably landing short (standard FS2004 feature).
If the airport does not support DME, 2 of the functions will not work. You can still use this feature, but you need to lower the gear yourself, and set speed to 140 knots as you approach the point where the ILS glide slope takes over.
NOTE: This gauge is optimised for 'normal' glide slope angles. Some airports have increased angles if the approach is restricted. This will cause a harder landing, and therefore a manual landing may be preferred.


Autotakeoff Control.
--------------------

Autotakeoff is achieved by selecting the appropriate buttons in auto pilot panel section. The aircraft should be in the default state, with engines on idle and the parking brake on. Select the required MACH speed, altitude ( note the minimum height that can be set shown in the tooltip and is calculated according to the airport elevation) and heading in the AP windows. Select the autotakeoff button and the brakes will switch off, the aircraft will roll, take off, stow the gear and turn to the required heading. As speed and altitude increase, the vertical speed will increase. As the altitude approaches the chosen value, the vertical speed will reduce, and the aircraft will settle to the chosen speed and altitude and the auto function will terminate leaving the aircraft in normal AP mode. You can turn auto off at any time, and re-adjust the AP settings if required.

Abort Takeoff.
--------------

In manual takeoff mode, if the RTO (Rejected Takeoff) is set on the Autobrake, at speeds greater than 80 kts, cut the throttles and the Autobrake activates.
The Abort Takeoff gauge can automate this function. When ready for takeoff, set RTO on the Autobrake. When rolling, the Abort Takeoff gauge will flash. At any speed, clicking this gauge activates Max Auto brakes on the autobrakes and fully reverses the engines. At 10 kts, the brakes release, the engines go to idle amd the parking brake is applied bringing the aircraft to a full stop. This gauge can also be used in Auto Takeoff mode if RTO is set. Activating the Abort gauge will automatically turn off Auto Takeoff and the auto stop routine will operate.

Auto AP off.
------------

As a general rule, when flying AP, make sure the joystick is centred. The elevator and aileron trim gauges show the joystick position with digital number readouts and these can be used to aid centering. With the 'Auto AP Off' switched on, any joystick movement more than 20° angle in any direction will automatically switch off all AP functions. This is also true if auto take-off or auto landing are switched on. If the joystick is first moved to greater than 20°, and then the 'Auto AP Off' is switched on, any function involving AP functions will not work. If 'Auto AP Off' is switched off, all AP functions are avaiable as normal and will not be affected with joystick movement. This can be a useful function when landing on ILS, but not using the autoland function. This allows you to take over for manual landing without having to frantically start clicking off AP functions.

Smoke and Effects Gauge.
========================

Pressing the keyboard 'I' key switches on the automatic smoke and effects gauge, and a grey 'S' icon will show in the top area of panel.  Read the Issues section regarding a couple of bugs. Switching this gauge on will,

1) Turn on the engine smoke that looks look engine exhaust fumes when the aircraft is stationary, which will 'stretch' out when the aircraft moves.

2) Turn on the winglet tip contrails automatically when a climb produces 1G or more or when the heading rate (turning) exceeds a certain value.

3) Turn on the wing top fog/mist automatically when the aircraft angle of attack is greater than 6° and below 5000 feet and below a certain speed.

4) Produces a blue glow from the rear of the engines.

5) Rain spray.

Additional Panel Notes
======================

You can change the Registration and Flight Number of the aircraft for spot and cockpit views in the aircraft list/choose window.

I'm not going to give details on all gauges because of the quantity. All gauges have tooltips, some with extra information where required, so the user should be able to work out what a gauge is and how to use it.

The HSI has a built in relative wind direction needle and speed value which only shows when there is any wind.
The DECISION HEIGHT gauge is adjustable.
The 'i' icon button brings up an information panel that should help with gauge positions and additional notes.
The AUTOTRIM is auto off and not available when the AP is on, as AP adjusts the trim when in AP flight.
The PUSHBACK moves the aircraft rearwards and can be used to steer. There are no sounds with pushback.
With the radio panel open, you can click on the appropriate memory field to memorise frequency. Click on this again to set frequency in the appropriate radio. Click on the appropriate clear area to clear the frequency from memory. A number of frequencies can be stored. The 'E' icon on the radio will set the emergency communication frequency.
The AP windows (speed, altitude, heading and VS) can be zeroed by clicking '0' in the left hand end of the windows.
The altitude value can be increased or decreased in steps of 100 or 1000 according to the '+' area clicked in the selector gauge.
The view can be panned by clicking on the appropriate areas on the general aircraft information gauge (positioned in the top center of the panel) which shows the simplified picture of the aircraft.
Timer/Alarm. You can click for Local or Zulu time mode, and also for Stop watch type timer which can be started, stopped and reset back to zero. To set the time alarm (Local or Zulu), set the required alarm time in the alarm window, and click the bell icon. You can leave the clock displaying or close it. If closed, for example, when the alarm time is reached, the clock will redisplay and an additional flashing warning will display and an alarm sound will play. To switch off the alarm, click on the bell icon again. The alarm numbers will show green if the alarm set time numbers are ahead of the clock time, and yellow if equal to or behind the clock time. For timer alarm, set the required elapsed time in the alarm window, start the timer and click the bell icon to activate the alarm. Again, the clock can be left displayed or closed. Actually, the bell icon can be clicked before setting or after. It does not matter when as it works by comparing the alarm setting with the time or timer numbers.
The TERRAIN FOLLOW gauge does not really suit this aircraft type, but I added it for some additional fun. When set, the aircraft attempts to follow the terrain topography at a fixed radio height. This would be better suited to a fast military jet for low level flight. Set the required radio height in the altitude window, and switch on the TF gauge. The AP should be on for speed, heading, altitude (and VS), that is, normal AP operation. The set height should not be less than approximately 500 feet. The way FS2004 operates is not perfect for this, and the height will vary by a few hundred feet. Also, FS2004 cannot read ground heights in front of the aircraft. Occasionally you will come across ground that is very steep (i.e. high hills) and the aicraft cannot climb fast enough to clear the obstacle and would crash into it. When the ground clearance is less than 200 feet, slew will automatically switch on and the aircraft will rise vertically to the ground clearance set and then switch slew off automatically to continue flying and clear the high ground. If one attempt is not enough, it will repeat the process until clearance is achieved. There is not much point in using this for moutainous areas. The gauge can also be used for a quick launch, that is, set the height in the altitude window when on the ground, and the other required perameters in the AP, switch on and the aircraft will rise vertically in slew mode until the required radio height is achieved and then fly on normally. Works better with minimal fuel (weight). All just a bit of fun really.
The MOUSE CONTROL gauge allows the use of the mouse to control the flight controls. The ailerons and rudder are combined. Click on the mouse icon to show the control. Left Click on the control and then release. You can then drag the needles around to fly the aircraft. Click a second time and the needles stop moving. Click again, etc. When the mouse icon is clicked to close the gauge, the controls are zeroed. Make sure the JOYSTICK IS CENTERED when using this feature otherwise the needles will jump around.
The PANEL LIGHTS can be turned on manually ('P') or automatically ('A). When the auto button is clicked only, the panel lights switch on or off automatically according to the Sun's height above the horizon and before the panel becomes too dark (or light).

The simple FMC gauge is displayed by clicking the FMC button. The gauge allows the input of the destination ICAO code and the aircraft will fly there. It works in conjuction with the AUTO PILOT so this must be active. The file C4_FMC_apt_list.txt lists available airports that can be used. The UK list is comprehensive, and a few international airports are also listed. I should like to add every airport in FS2004, but this would take a very long time. XML coding will not access data base files, so all the information was written into the gauge itself. Waypoint destinations can be added up to a maximum of 9. All points are airports. Set the leg number (starting with '00'), ICAO code and height required for the leg. The active little '+' and '-' characters show where the alpha/numeric information can be scrolled in as input for the gauge. To add another leg, increase the leg number to the next value and scroll in the next ICAO code. The previous inputs will be remembered. Do not forget to input the required leg height. As each waypoint is reached, the highlight bar will move down to show the active leg. The gauge automatically progresses onto the next leg. When the last leg is completed, the gauge will switch itself off. To activate the FMC, click on 'ACTIVATE'. If the 'MAN RADIO' area is clicked, the auto radio feature is activated and the NAV1 or ADF radios are set for each leg thus showing the radio ID. The radio information is not used for navigation, and mainly uses ILS frequencies, and this feature is just for information only. Radio ID's are shown when within 30 NM of the required transmitter, so that incorrect ID's are not shown during the leg if the same frequency is used by other transmitters. Clicking the 'CLEAR LEG' area will clear all legs back to leg 1, and resets this to zeros. The gauge changes leg or switches off when within 5 NM of the airport, otherwise the sensitivity becomes too great and the aircraft course changes dramatically for a moment when approaching the airport. The gauge works by taking the ICAO code, and looking up the built in Lat and Long positions for the airports. The heading is then calculated (thanks Arne) and set on the autopilot. The distance to the next waypoint is also shown. The ICAO list text file is not a data base and just shows the ICAO codes available.
A second FMC gauge was added to be the same as the above, but allows the user to input Latitude and Longatude values instead of ICAO codes.


General Ramble.
---------------

I could write a lot more on this aircraft, but I think part of the fun is finding out for yourself. Initial impressions are that this is a complex aircraft. It really does not have to be. You can fly it quite easily first off. I designed the panel for ease of use with everything you need just a mouse click away and hopefully easy to read.

Issues
------

When starting this aircraft or when using flight reset, you may hear a panel noise. This is normal, and just allow a few seconds for everything to settle down.
The pushback gauge does not work if the smoke is on (this is an FS2004 bug), however, the pushback gauge will automatically switch the smoke gauge off while in use, and switch the smoke gauge back on when pushback is clicked again to switch off. If the smoke gauge is off prior to pushback, then this is not an issue. An 'S' icon shows in the top area of panel if smoke is on. If any gauges missbehave, try switching the smoke off, but I have not seen any more.


Additional Ideas.
-----------------

The C26 panel is quite comprehensive and can be used with other aircraft without deleting the original panel of another aircraft. It can be selected in the aircraft menu window.
In the aircraft of your choice, add a subfolder panel.c26, that is, folder ......\FS2004\aircraft\aircraft name\panel exists and add the folder ......\FS2004\aircraft\aircraft name\panel.c26.
Then copy the files panel.cfg and associated bitmaps from the C26 panel subfolder to the new subfolder.

Then, for example, in the Boeing 737-400 aircraft.cfg file add this section under the last [fltsim.x] section,

[fltsim.4]    \\ the number .4 needs to be the next in the sequence.
title=Boeing 737-400  C25 Panel
sim=Boeing737-400
model=
panel=c26
sound=
texture=3
kb_checklists=Boeing737-400_check
kb_reference=Boeing737-400_ref
atc_id=EI-CMO
atc_id_color=0xffffffff
atc_airline=EMERALD HARBOR AIR
atc_flight_number=3011
ui_manufacturer=Boeing
ui_type=737-400
ui_variation=Aer Lingus Airlines - C25 Panel
description=One should hardly be surprised, etc.

When this aircraft is selected in the aircraft menu window, the panel will be shown as one of the choices.

Credits.
--------

*TIM ADAMS* for being the chief test pilot, crash dummy and tyre kicker, flying many, many hours with this aircraft and giving very reliable feedback. Also for his generous enthusiasm and support. This project would have been far more difficult without this help. Many thanks Tim, and I look forward to working together on future projects.

Arne Bartels for a lot of help in teaching me XML code, and for supplying the compiling code for the fuel dump gauge and for supplying the TCAS radar. Also for bothering to explain how a lot of this code works. Many thanks Arne, you've been a massive help.

Doug Dawson for the FS2004 panel sound system.

Chuck Dome for the code to the autotrim gauge. Many thanks Chuck.

Vladimir Sokolov for xml advice.

Mark Hubbard for a lot of initial help and beta testing, and for the Aircraft Manual.

John McKeon for the idea (and instructions) to make the C25 panel available to other aircraft without deleting an original panel.

Pete Dowson for the useful FSUIPC package.

FPDA for the callout gauge.

The authors of FSDS2 which is an amazing application, in which the animations were produced as well.

If I have left anyone out, my apologies, and thanks.

Legalities.
-----------------

This aircraft package is supplied as Freeware and the associated copyright details apply.
No financial gain should be made with it and it must not be used on a CD compilation.
No modification for distribution without the permission of the author.
Ask permission for use of any component of this aircraft package, including any XML coding.
This aircraft package is not to be loaded to a fee paying server or site for access.
Use at your own risk. I am in no way responsible for anything that happens to you, your software or your hardware equipment as a result of using these files.

I hope you enjoy flying this aircraft.

Nick Pike.
UK
C26.zip
| Имя файла | Дата | Размер |
|---|---|---|
| C26/ | 30.10.2005 23:10 | |
| C26/additional_files/ | 10.10.2005 02:09 | |
| C26/additional_files/dsd_xml_sound.gau | 23.10.2003 01:43 | 39 KB |
| C26/additional_files/FSUIPC.dll | 16.04.2004 14:28 | 193 KB |
| C26/additional_files/GaugeSound.dll | 01.05.2003 21:31 | 40 KB |
| C26/additional_files/TrafficInfo.DLL | 19.09.2003 17:34 | 8 KB |
| C26/additional_Sound/ | 10.10.2005 02:09 | |
| C26/additional_Sound/dsd_xml_01.wav | 12.05.2002 23:17 | 2 MB |
| C26/additional_Sound/dsd_xml_02.wav | 12.05.2002 23:22 | 2 MB |
| C26/additional_Sound/dsd_xml_03.wav | 26.12.2002 04:53 | 99 KB |
| C26/additional_Sound/dsd_xml_04.wav | 29.06.2002 15:27 | 47 KB |
| C26/additional_Sound/dsd_xml_05.wav | 30.06.2002 20:17 | 65 KB |
| C26/additional_Sound/dsd_xml_06.wav | 02.10.2003 17:05 | 3 KB |
| C26/additional_Sound/dsd_xml_07.wav | 31.08.2002 11:38 | 37 KB |
| C26/additional_Sound/dsd_xml_08.wav | 02.07.2002 22:33 | 102 KB |
| C26/additional_Sound/dsd_xml_09.wav | 26.12.2002 04:51 | 39 KB |
| C26/additional_Sound/dsd_xml_10.wav | 24.09.1999 21:57 | 20 KB |
| C26/additional_Sound/dsd_xml_11.wav | 26.12.2002 04:55 | 85 KB |
| C26/additional_Sound/dsd_xml_12.wav | 26.12.2002 04:50 | 48 KB |
| C26/additional_Sound/dsd_xml_13.wav | 01.11.2003 18:45 | 2 KB |
| C26/additional_Sound/dsd_xml_14.wav | 05.04.2003 22:13 | 70 KB |
| C26/additional_Sound/dsd_xml_15.wav | 20.01.2004 23:57 | 425 KB |
| C26/additional_Sound/dsd_xml_16.wav | 25.01.2004 03:19 | 424 KB |
| C26/additional_Sound/dsd_xml_17.wav | 06.03.2004 06:29 | 86 KB |
| C26/additional_Sound/FPDA_Boeing_100ft.wav | 01.10.1998 00:02 | 9 KB |
| C26/additional_Sound/FPDA_Boeing_10ft.wav | 30.09.1998 23:57 | 4 KB |
| C26/additional_Sound/FPDA_Boeing_200ft.wav | 01.10.1998 00:02 | 8 KB |
| C26/additional_Sound/FPDA_Boeing_20ft.wav | 30.09.1998 23:58 | 4 KB |
| C26/additional_Sound/FPDA_Boeing_300ft.wav | 01.10.1998 00:03 | 10 KB |
| C26/additional_Sound/FPDA_Boeing_30ft.wav | 30.09.1998 23:58 | 4 KB |
| C26/additional_Sound/FPDA_Boeing_400ft.wav | 01.10.1998 00:04 | 9 KB |
| C26/additional_Sound/FPDA_Boeing_40ft.wav | 30.09.1998 23:59 | 5 KB |
| C26/additional_Sound/FPDA_Boeing_50ft.wav | 30.09.1998 23:59 | 5 KB |
| C26/Aircraft.cfg | 28.04.2004 23:03 | 13 KB |
| C26/B-575_Check.txt | 09.04.2003 23:20 | 4 KB |
| C26/B-575_REF.txt | 09.04.2003 23:32 | 1 KB |
| C26/Boeing 575 Aircraft Manual.doc | 11.07.2001 20:27 | 31 KB |
| C26/C26fsds2.air | 28.04.2004 23:01 | 10 KB |
| C26/C26fsds2_notes.txt | 03.04.2003 23:33 | |
| C26/C26_Aircraft_for_newfiles_display.gif | 26.04.2004 00:32 | 169 KB |
| C26/C26_Aircraft_for_newfiles_display.JPG | 30.10.2005 23:09 | 71 KB |
| C26/C26_flight1.gif | 10.04.2003 01:13 | 225 KB |
| C26/C26_landing.gif | 10.04.2003 01:25 | 256 KB |
| C26/C26_landing.JPG | 30.10.2005 23:10 | 82 KB |
| C26/C26_lights.gif | 26.04.2004 00:46 | 59 KB |
| C26/C26_lights.JPG | 30.10.2005 23:10 | 20 KB |
| C26/C26_mist.gif | 10.04.2003 01:12 | 287 KB |
| C26/C26_panel_night_for_newfiles_display.gif | 26.04.2004 00:42 | 111 KB |
| C26/C26_RADAR_Instructions.txt | 26.04.2004 22:36 | 2 KB |
| C26/C26_Readme.txt | 27.04.2004 00:47 | 26 KB |
| C26/C4_FMC_apt_list.txt | 01.06.2003 17:21 | 4 KB |
| C26/effects/ | 10.10.2005 02:09 | |
| C26/effects/fx_C25_burner.fx | 20.01.2003 20:38 | 1 KB |
| C26/effects/fx_C25_contrail_tip.fx | 17.07.2003 22:14 | 1 KB |
| C26/effects/fx_C25_exhaust.fx | 24.12.2003 02:17 | 1 KB |
| C26/effects/fx_C25_land_light_splash.fx | 29.03.2003 21:13 | 1 KB |
| C26/effects/fx_C25_left_fog.fx | 29.03.2003 14:27 | 8 KB |
| C26/effects/fx_C25_rainspray.fx | 01.02.2004 03:00 | 6 KB |
| C26/effects/fx_C25_right_fog.fx | 29.03.2003 14:25 | 8 KB |
| C26/effects/fx_C25_shimmer.fx | 04.03.2004 00:25 | 2 KB |
| C26/effects/fx_C25_strobe_ganged.fx | 19.05.2003 21:45 | 9 KB |
| C26/effects/fx_C25_taxi_light_splash.fx | 29.03.2003 21:07 | 1 KB |
| C26/effects/fx_C25_tipswirl.fx | 18.07.2003 01:23 | 2 KB |
| C26/effects/fx_C25_vclight.fx | 21.02.2004 23:42 | 1 KB |
| C26/effects/fx_C25_well.fx | 29.03.2003 15:09 | 2 KB |
| C26/effects/fx_C25_well_main.fx | 29.03.2003 22:12 | 1 KB |
| C26/ERRORS_MUST_READ.txt | 27.04.2004 00:48 | 822 B |
| C26/FPDA_readme.txt | 26.04.2004 22:17 | 4 KB |
| C26/FSUIPC.txt | 26.04.2004 00:48 | 300 B |
| C26/Model/ | 10.10.2005 02:09 | |
| C26/Model/c26fsds2.mdl | 06.03.2004 06:07 | 843 KB |
| C26/Model/Model.cfg | 26.04.2004 02:01 | 25 B |
| C26/move_map.gif | 21.06.2003 18:52 | 114 KB |
| C26/Panel/ | 10.10.2005 02:09 | |
| C26/Panel/C25vcplane.bmp | 24.10.2003 21:38 | 1 MB |
| C26/Panel/C25_landing.bmp | 20.06.2003 18:27 | 91 KB |
| C26/Panel/C25_mainpanel_1024.bmp | 03.05.2003 23:15 | 486 KB |
| C26/Panel/c26gauge.cab | 26.04.2004 00:00 | 6 MB |
| C26/Panel/fpda_boeing_callout.gau | 04.02.2003 03:06 | 16 KB |
| C26/Panel/FSUIPC_DUMPv2004.gau | 31.07.2003 21:28 | 21 KB |
| C26/Panel/panel.cfg | 27.04.2004 01:20 | 23 KB |
| C26/Panel/TrafficRadar.gau | 25.04.2004 04:13 | 408 KB |
| C26/Sound/ | 10.10.2005 02:09 | |
| C26/Sound/a1.wav | 02.03.2004 23:59 | 495 KB |
| C26/Sound/a2.wav | 02.03.2004 23:58 | 423 KB |
| C26/Sound/a3.wav | 02.03.2004 23:58 | 359 KB |
| C26/Sound/a4.wav | 03.03.2004 22:55 | 395 KB |
| C26/Sound/aircond.wav | 03.03.2004 22:53 | 388 KB |
| C26/Sound/c1.wav | 02.03.2004 23:53 | 400 KB |
| C26/Sound/c2.wav | 02.03.2004 23:47 | 383 KB |
| C26/Sound/c2strt.wav | 03.03.2004 22:49 | 460 KB |
| C26/Sound/c3.wav | 02.03.2004 23:45 | 215 KB |
| C26/Sound/c4.wav | 02.03.2004 23:44 | 260 KB |
| C26/Sound/capdisc.wav | 02.03.2004 23:41 | 42 KB |
| C26/Sound/cdoorclose.wav | 02.03.2004 23:37 | 506 KB |
| C26/Sound/cdooropen.wav | 02.03.2004 23:37 | 517 KB |
| C26/Sound/cflaps.wav | 02.03.2004 23:35 | 346 KB |
| C26/Sound/cgrdn.wav | 02.03.2004 23:30 | 367 KB |
| C26/Sound/cgrup.wav | 02.03.2004 23:29 | 362 KB |
| C26/Sound/cgrwrn.wav | 02.03.2004 23:25 | 153 KB |
| C26/Sound/cshut.wav | 03.03.2004 23:02 | 2 MB |
| C26/Sound/cstrt.wav | 03.03.2004 22:41 | 2 MB |
| C26/Sound/ctouchc.wav | 02.03.2004 23:05 | 28 KB |
| C26/Sound/ctouchl.wav | 02.03.2004 23:12 | 21 KB |
| C26/Sound/ctouchr.wav | 02.03.2004 23:11 | 21 KB |
| C26/Sound/cwind.wav | 02.03.2004 23:00 | 261 KB |
| C26/Sound/sound.cfg | 26.04.2004 00:01 | 12 KB |
| C26/Sound/xa1.wav | 02.03.2004 22:37 | 33 KB |
| C26/Sound/xa2.wav | 02.03.2004 22:57 | 474 KB |
| C26/Sound/xa3.wav | 02.03.2004 22:38 | 115 KB |
| C26/Sound/xa4.wav | 02.03.2004 22:46 | 468 KB |
| C26/Sound/xc1.wav | 02.03.2004 22:15 | 126 KB |
| C26/Sound/xc2.wav | 02.03.2004 22:14 | 113 KB |
| C26/Sound/xc2strt.wav | 03.03.2004 00:00 | 557 KB |
| C26/Sound/xc3.wav | 02.03.2004 22:13 | 110 KB |
| C26/Sound/xc4.wav | 02.03.2004 22:05 | 163 KB |
| C26/Sound/xccomb4.wav | 02.03.2004 22:52 | 657 KB |
| C26/Sound/xcshut.wav | 03.03.2004 21:53 | 1 MB |
| C26/Sound/xcstrt.wav | 02.03.2004 22:50 | 2 MB |
| C26/Texture/ | 10.10.2005 02:09 | |
| C26/Texture/ali1.bmp | 11.01.2003 00:09 | 341 KB |
| C26/Texture/Beaconflare_LM.bmp | 30.03.2003 20:53 | 85 KB |
| C26/Texture/C25L_L.bmp | 16.07.2003 22:23 | 1 MB |
| C26/Texture/C25vcplane_L.bmp | 18.02.2004 01:49 | 1 MB |
| C26/Texture/C25vcppanel.bmp | 17.07.2003 01:58 | 1 MB |
| C26/Texture/C25vcppanel_L.bmp | 20.02.2004 22:44 | 1 MB |
| C26/Texture/confus.bmp | 29.02.2004 05:52 | 1 MB |
| C26/Texture/engC2.bmp | 19.11.2002 22:18 | 1 MB |
| C26/Texture/extraextras.bmp | 02.02.2003 01:14 | 341 KB |
| C26/Texture/extras.bmp | 15.01.2003 15:24 | 1 MB |
| C26/Texture/fanc2.bmp | 19.07.2001 00:49 | 65 KB |
| C26/Texture/fanc2hi.bmp | 01.02.2003 23:27 | 65 KB |
| C26/Texture/fin.bmp | 19.11.2002 22:26 | 1 MB |
| C26/Texture/fin_L.bmp | 28.03.2003 21:49 | 1 MB |
| C26/Texture/pedal.bmp | 08.02.2004 03:35 | 65 KB |
| C26/Texture/pilot.bmp | 05.05.2001 18:46 | 257 KB |
| C26/Texture/r3kcabin.bmp | 25.11.2001 00:18 | 257 KB |
| C26/Texture/r3kcabin_LM.bmp | 25.11.2001 00:19 | 257 KB |
| C26/Texture/rotating_beacon.bmp | 11.02.2004 00:44 | 86 KB |
| C26/Texture/struts.bmp | 14.01.2003 22:54 | 341 KB |
| C26/Texture/trans.bmp | 09.01.2003 23:42 | 341 KB |
| C26/Texture/trans_vc.bmp | 02.02.2003 15:17 | 341 KB |
| C26/Texture/Turbine.bmp | 09.03.2002 21:45 | 65 KB |
| C26/Texture/wingline.bmp | 19.11.2002 23:08 | 1 MB |
| C26/Texture.1/ | 10.10.2005 02:09 | |
| C26/Texture.1/ali1.bmp | 27.02.2004 02:16 | 341 KB |
| C26/Texture.1/Beaconflare_LM.bmp | 30.03.2003 20:53 | 85 KB |
| C26/Texture.1/C25L_L.bmp | 16.07.2003 22:23 | 1 MB |
| C26/Texture.1/C25vcplane_L.bmp | 18.02.2004 01:49 | 1 MB |
| C26/Texture.1/C25vcppanel.bmp | 17.07.2003 01:58 | 1 MB |
| C26/Texture.1/C25vcppanel_L.bmp | 20.02.2004 22:44 | 1 MB |
| C26/Texture.1/confus.bmp | 01.03.2004 22:02 | 1 MB |
| C26/Texture.1/engC2.bmp | 26.02.2004 01:04 | 1 MB |
| C26/Texture.1/extraextras.bmp | 02.02.2003 01:14 | 341 KB |
| C26/Texture.1/extras.bmp | 24.02.2004 01:40 | 1 MB |
| C26/Texture.1/fanc2.bmp | 19.07.2001 00:49 | 65 KB |
| C26/Texture.1/fanc2hi.bmp | 01.02.2003 23:27 | 65 KB |
| C26/Texture.1/fin.bmp | 24.02.2004 01:32 | 1 MB |
| C26/Texture.1/fin_L.bmp | 28.03.2003 21:49 | 1 MB |
| C26/Texture.1/pedal.bmp | 08.02.2004 03:35 | 65 KB |
| C26/Texture.1/pilot.bmp | 05.05.2001 18:46 | 257 KB |
| C26/Texture.1/r3kcabin.bmp | 25.11.2001 00:18 | 257 KB |
| C26/Texture.1/r3kcabin_LM.bmp | 25.11.2001 00:19 | 257 KB |
| C26/Texture.1/rotating_beacon.bmp | 11.02.2004 00:44 | 86 KB |
| C26/Texture.1/struts.bmp | 14.01.2003 22:54 | 341 KB |
| C26/Texture.1/trans.bmp | 09.01.2003 23:42 | 341 KB |
| C26/Texture.1/trans_vc.bmp | 02.02.2003 15:17 | 341 KB |
| C26/Texture.1/Turbine.bmp | 09.03.2002 21:45 | 65 KB |
| C26/Texture.1/wingline.bmp | 27.02.2004 14:38 | 1 MB |
| C26/voteforme.gif | 09.06.2003 01:10 | 13 KB |
| C26/_C26_Install.txt | 27.04.2004 00:46 | 4 KB |
| avsim_ru.diz | 31.10.2005 03:04 | 485 B |
| Итого: | 65 MB | |
Boeing 575
| Rating: 4.9!
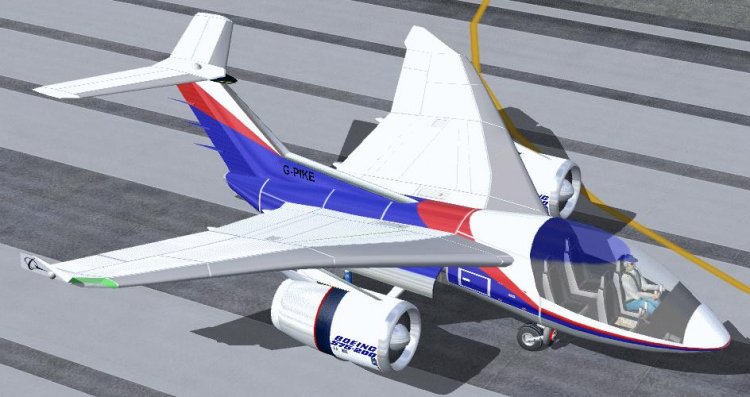
Boeing 575 - new projects of well-known manufacturer. Shapes are nice. Well done model. Copy C26 folder into MSFS directory for installation.
→ Size:
28 MB
→ Date:
20 years ago (30.10.2005 22:06)
→ Author:
→ License:
Freeware - Free version, Unlimited Distribution
→ Downloaded:
3680 time(s)